You might have heard the rumors: “Email marketing’s dead.”
Don’t believe it! Rest assured email is alive and well. While it’s true that most of us facing an overloaded inbox, the truth is that people aren’t tired of email altogether, just the ones that they’re not interested in.
Today, there are more registered email accounts than ever before –and perhaps most importantly, we don’t have to be on our computers to read them. Instead, we have easy access on our smartphones! What marketer wouldn’t want to have access to customers, wherever they go?
Bottom of Form.
Email is still a tremendously valuable channel for reaching out to your customers –both existing and potential.
According to Adestra’s 2016 Consumer Adoption & Usage Study, nearly 68 percent of teens and 73 percent of Millennials said they prefer to receive communication from a business via email. What’s more, is nearly half claim that they rely on email to buy things online.
That’s big news!
If you’re thinking about implementing an email marketing campaign, there’s no time like the present. Of course, your time is important, so it’s vital that you get your ducks in a row up front, to ensure that you’re able to execute your strategy in the most efficient way possible. Fortunately, there are tools that are available today that make it easy to send out effective email campaigns.
Ready to get started?
Let’s go!
Getting Started: MailChimp
Your audience is bombarded on a daily basis with offers and promotions from your competitors and other businesses or organizations. For this reason, it’s more important than ever that you develop a strategy that keeps your audience engaged with you so that you can grow your list and continue to nurture your relationship with the subscribers that you currently have.
Most articles will give you a bird’s eye view of email marketing and then instruct you on different steps to take to get your email campaign off the ground. In this article, I’ll share the basics of email marketing while simultaneously showing you how to get started using MailChimp, one of the more popular email marketing platforms for business owners, especially those who are just getting started.
First, let’s get inside your audience’s head for a second.
We have selected MailChimp for the following reasons:
- It’s easy to get started with and user-friendly
- It’s free if you have less than 2000 subscribers
- You can segment your subscribers into lists for custom emails
- It syncs with Google Analytics and major ecommerce providers
- It features a simple and easy-to-use interface
- Includes predesigned layouts
- It automates many aspects of your email marketing
- It enables split testing
- And more!
The first thing you are going to want to do is to go to MailChimp and sign up. You will need an email address, and will need to create a username and password.
Creating Lists
MailChimp allows you to organize your subscribers with lists. These lists will form the foundation for each of your email marketing campaigns.
Access your lists under the Lists tab.
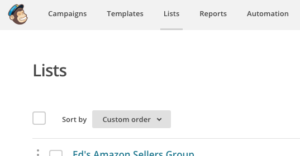
There you’ll find an option to create your first mailing list. You can also import a list if you have one already.
MailChimp allows you to create as many lists as you would like. Once you are ready to build your first list, MailChimp will ask for some information.
Here’s the information you’ll need initially when creating your first list:
- Name of the list
Be sure to note if it is a subset of another list to keep track. - Default Reply-To Email
This is the email address that the subscriber will see. - Default From Name
This is the name that they will see it is from. - Reminder of how they got on the list
This will appear in the footer section and remind the subscriber of how they got on your list. - Default Subject
This is the subject line for email, can be changed and customized later. - Your Contact Information
- Notifications
When someone signs up for your list or unsubscribes, you can get this for everyone or once a day. You will need to select an email address to receive notifications.
Whenever you create a new list, you’ll be asked to input default info, such as who the emails are coming from.
You can choose to check the box that allows you to send a welcome email once someone joins your list. This gives you an excellent opportunity to say, “Thank you for signing up,” and it also allows you to send them some additional information such as a PDF or link to an URL that you want them to see.
Give your subscribers the option to either receive plain text or HTML emails. You also have the option to send a subscriber who unsubscribes from your list a confirmation email letting them know they have been taken off your list.
Creating Sign up Forms
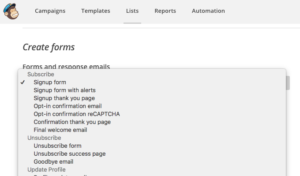
Now, go directly to sign up forms and click general forms. Once you are there, select ‘Signup thank you page.’ This is a form that will take them to an URL once they sign up for your email list, thanking them for signing up.
You may also select an option to have them go to their email and confirm the subscription. This is referred to as a double opt-in. This means that if someone subscribes to your email list on your website, it’ll send a confirmation to their email –as an added layer of security to the process.
Once a recipient opens the email, they will be instructed to click the link it contains. When they do, it will take them to an URL that will welcome and thank them for subscribing and provide a link that will lead them back to your website.
Editing Forms and Emails
MailChimp also gives you the option to edit all of your forms. It is a simple process, you just need to click edit and then save the document. Make sure you review each document before sending it out.
You can also sync your account to Google Analytics, which is invaluable if you’re hoping to track the success of your campaigns, and you should! This will allow you to track important metrics –such as subscribers who click a link in the email to visit your website, emails that were opened and followed by at least one click, emails that didn’t open, and more!
To connect your accounts, you’ll need to paste your Google Analytics tracking ID. This can be found in your Google Analytics account. Navigate to the admin tab in your Google Analytics account and click Tracking Info. Then click the tracking code.
Get our How To Implement Your First Email Campaign Efficiently Worksheet delivered right to your inbox.
Launching Your First Campaign
Next, it’s time to get your message out to your audience by creating an email campaign.
To get started, navigate to the Campaigns page, and click Create Campaign.
MailChimp gives you the option to select four different types of campaigns:
- Regular Campaign
The most popular campaigns. Set it to send now or at a later date. - Plain Text Campaign
These campaigns are text only with no formatting options. - A/B Split Campaign
This option will send three versions of your campaign to different parts of the list, and then sends the highest response version to the rest of your list. - RSS-Driven Campaign
Allows you to combine content from an RSS feed into your campaign and automatically send it to your list (i.e. a blog post).
On the Recipients step, choose a list from the drop-down menu. You’ll be able to choose the entire list or select a segmentation option.
Then, on the Setup step, you can input things like your Email Subject, preview text, from name, and from email address.
Next comes the Template step, where you’ll have the option of choosing one of the following options:
- Layouts – Choose a featured or basic template
- Themes – Choose from predesigned layouts
- Saved templates – Select a template you’ve saved previously
- Campaigns – See recently sent campaigns
- Code your own – Important layouts from outside of MailChimp
Once you select the template, you begin to modify it to your specifications. The template is there to save you time, and help you to maintain consistency with your logos, layouts, and signatures.
To add your logo you simply need to upload your logo from one of your folders and save it into each template. You will also be able to place a link to your website if someone clicks the logo while in the email. You can also insert links to your social media sites somewhere within the template. Have fun!
Here is a checklist of things that you’ll need to consider in order to launch a campaign:
- Select the list that you want to send your campaign to.
- Be sure to add your email to the list so ensure the emails have been sent.
- Decide whether you want to send to the entire list or a segment of the list.
- Name the campaign.
- Write in an email subject line (you are allowed 150 characters).
- Select who the email is from and also select a return email.
- Help to keep your email out of the spam box by personalizing the “To” field so that the email is addressed specifically to the person.
- Select how you would like to track the campaign. If you have Google Analytics, you need to connect your campaign to your Google Analytics account.
- Select the template you would like to use for the campaign or select a template you have already saved.
- Enter Default Header Content – a preview of what the campaign is about.
- Check the MailChimp confirmation page to assure everything is correct and select to send campaign right away or schedule to launch a campaign later.
- Once you send the campaign out, check your email to see that you received your message as well.
Congratulations! You have successfully launched your first email campaign. Now let’s look at automation –creating automated emails in response to actions that your subscribers take.

Add Automation
Automation is a handy set of options that allow you automate, to some extent, what gets sent to your subscribers. This is determined based on what actions they take.
Select the tab on the right that says, “Add Automation.” From there you can choose the list you want to set up an autoresponder campaign for.
Your first autoresponder campaign could, for instance, be a welcome series of emails to familiarize your subscribers with you, your product and your brand.
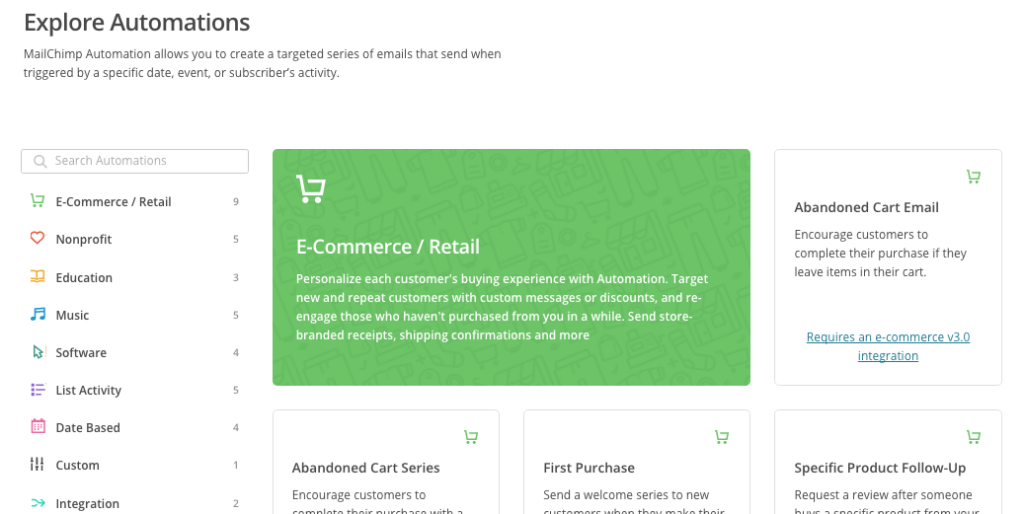
After you have selected the campaign, you can name it, set the tracking, and set the triggers. The triggers tell you when to send the email. For example, most business owners will want an email sent right after someone subscribes. The next step is to design the email with subject line, graphics, logo, text, and links. Once you have created all of the templates, you are ready to initiate your first successful autoresponder campaign.
Analyzing Your Campaign
Once you have sent out your first campaign, the next step is to see how your subscribers respond.
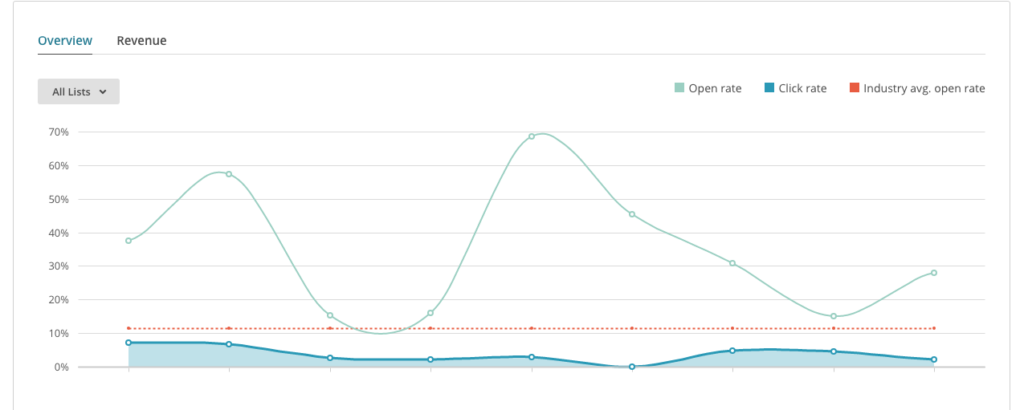
Select the Reports Tab on the homepage and then select the campaign you would like to analyze. You will be able to see your open rate –the number of people that opened the email, as well as the “click rate” –emails that were opened and followed with at least one click.
Below is a list of statistics you will be able to track:
- Sent to – This is essentially your list of subscribers
- Opens – The number of people that opened the email
- Clicks – Emails that were opened and followed by at least one click
- Didn’t Open – Emails that were received but not opened
- Bounced – Emails that were sent but not delivered
- Unsubscribed – Emails that were received and then replied to remove from the list
- Complained – Emails that were received and a complaint was sent to you by the recipient
It is also important to check 24-hour performance. This will allow you to see what time of the day the majority of your audience opens their emails. This data will help you determine what time of the day to send future campaigns in order to get the highest response rate.
The dashboard will also show you what links people are selecting once they open the email if you have multiple links embedded in the campaign.
Your subscribers also receive a member rating base of their engagement in each campaign. It’s important to track your results to see how you can optimize future campaigns and continually increase your open and click rates.
Did you get all that?
Now you have a good understanding of the nuts and bolts of an email campaign in MailChimp. If you’d like to learn more about creating a successful email campaign, be sure to have a look at: The Components of a Successful Email Deliverability Strategy.
As you run more campaigns, you will begin to see trends in how your audience responds to your emails and then you can make adjustments accordingly. Continue to build your list, send out engaging emails, measure, adjust, and repeat. Before you know, you’ll start seeing the results of your email campaigns.
Have you used MailChimp? What’s your favorite email marketing tool?
Get our How To Implement Your First Email Campaign Efficiently Worksheet delivered right to your inbox.


